


Pre-Flight Checklist: Essential Items Every Pilot Needs
Flying safely starts with preparation. A pre-flight checklist is your best tool to ensure both you and your aircraft are ready for the skies. Forgetting even small details, like the 1935 Boeing B-17 crash caused by unreleased gust locks, can lead to serious consequences. Here’s a quick guide to what every pilot should check before takeoff:
- Personal Readiness: Use the IMSAFE checklist to evaluate your health, stress, fatigue, and other factors. If you’re unfit in any area, don’t fly.
- Aircraft Documents: Confirm ARROW documents (Airworthiness, Registration, Radio License, Operating Limitations, Weight/Balance) are onboard and up-to-date.
- Navigation Tools: Prepare both electronic and paper backups for charts and flight plans. Use a reliable kneeboard for easy access.
- Communication Gear: Choose a noise-canceling headset with long battery life and test it before flight.
- Aircraft Inspection: Conduct a thorough walk-around to check fuel quality, control surfaces, tires, and engine components.
- Emergency Equipment: Verify fire extinguishers, ELT, seatbelts, and first-aid kits are functional and accessible.
Every step matters. By following a systematic checklist, you reduce risks and increase confidence for a safe and smooth flight.
Complete Pre-Flight Checklist for Pilots: IMSAFE and ARROW Verification Steps
How To Preflight An Airplane #studentpilots #privatepilot
sbb-itb-5051167
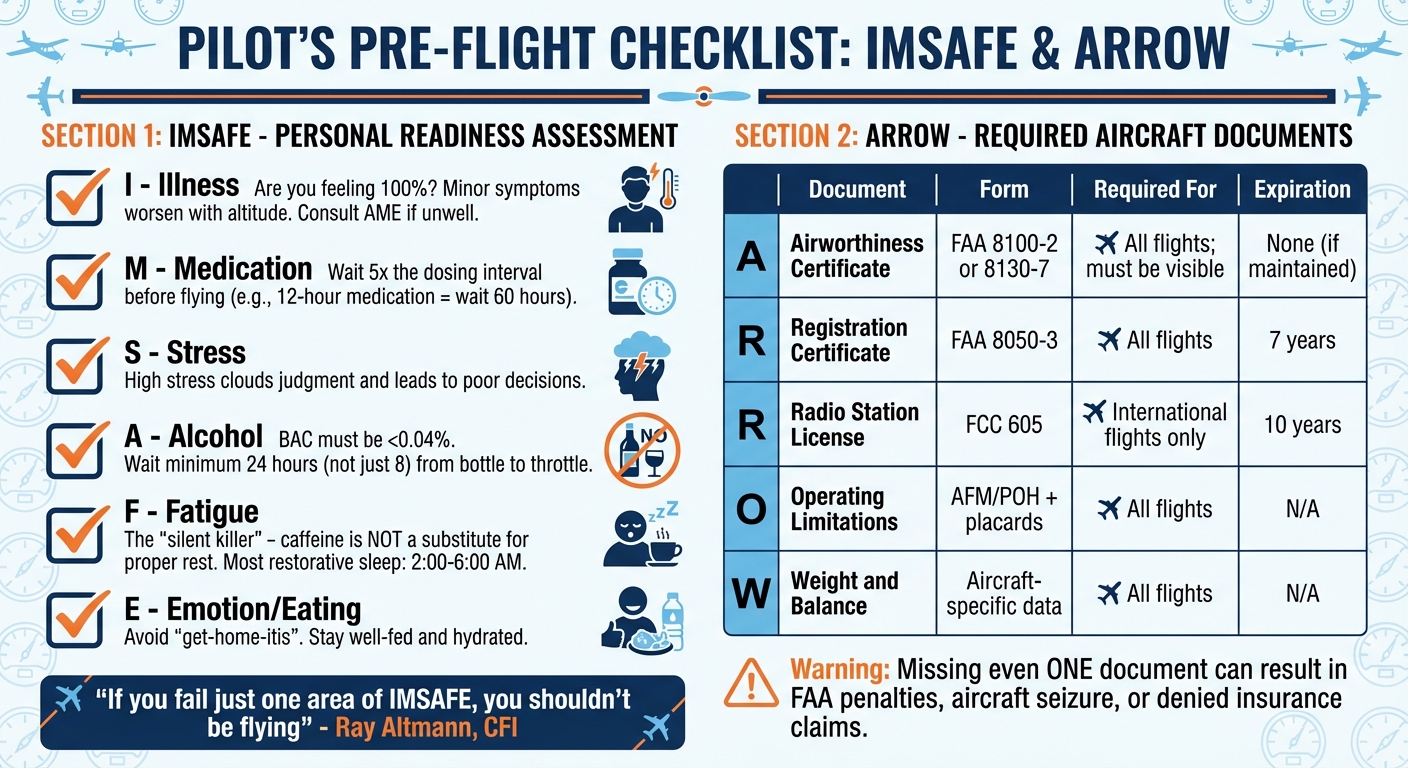
IMSAFE: Personal Readiness Assessment
Before you even glance at gauges or documents, take a moment to assess yourself. Sure, the aircraft might be ready to go, but what about you? Under FAR 91.3, the Pilot in Command is responsible for ensuring their own health and readiness before taking flight. The IMSAFE checklist is a straightforward tool to help you figure out if you're physically and mentally prepared to fly.
This handy mnemonic, outlined in the Aeronautical Information Manual under "Fitness For Flight", is a self-check system designed to minimize human-factor risks. As Ray Altmann, Chief Flight Instructor at Epic Flight Academy, puts it:
"If you fail just one area of IMSAFE, you shouldn't be flying".
Let’s break down each IMSAFE factor to help you determine if you're truly ready to take to the skies.
What IMSAFE Stands For
Each letter in IMSAFE represents a key factor to evaluate before every flight. Missing the mark in even one area means you're not fit to fly.
- Illness: Are you feeling under the weather? Even minor symptoms, like a cold, can escalate in the air. For example, sinus pressure or ear congestion can worsen with altitude changes, possibly leading to vertigo or inner ear damage. If you're not feeling 100%, consult an Aviation Medical Examiner (AME) instead of self-diagnosing.
- Medication: Medications - whether prescription or over-the-counter - can impact your alertness or mental clarity. For instance, antihistamines like Benadryl can make you drowsy. A good rule of thumb: wait five times the dosing interval before flying. So, if a medication is taken every 12 hours, wait 60 hours before getting in the cockpit.
-
Stress: Stress comes in many forms - physical, environmental, or psychological - and it can sap the focus you need for safe flying. As Eckhart Tolle famously said:
High stress can cloud your judgment and lead to poor decisions."Stress is caused by being 'here' but wanting to be 'there'".
- Alcohol: According to 14 CFR 91.17, your Blood Alcohol Concentration (BAC) must be below 0.04%. While the legal minimum wait time is 8 hours from "bottle to throttle", the FAA advises waiting at least 24 hours. Even if your body processes alcohol relatively quickly (about 1.5 hours per drink), hangovers can still impair focus and cause nausea or dizziness.
- Fatigue: Fatigue is often called the "silent killer" because it sneaks up on you, affecting your cognitive function, coordination, and alertness. Sleep debt accumulates quickly - missing just a few hours of sleep over consecutive nights can leave you with a significant deficit. The most restorative sleep typically happens between 2:00 AM and 6:00 AM. Keep in mind, caffeine or energy drinks are no substitute for proper rest.
- Emotion/Eating: Your emotional state and physical needs are just as important. Feelings like anger, depression, or anxiety can lead to "get-home-itis", the dangerous urge to complete a flight despite being unfit. On top of that, hunger and dehydration can impair your focus and mood. Make sure you're well-fed and hydrated before you fly.
Flight instructor Stan Dunn puts it perfectly:
"A go-around is the successful completion of an unsuccessful approach. Likewise, if you (the pilot) are not fit to fly, it is not a failure. The failure comes only if you decide to fly anyway".
Delaying or canceling a flight isn't a defeat - it’s a smart, proactive safety decision. Think of it as a victory for good judgment, not a setback.
ARROW: Required Aircraft Documents
After ensuring you're fit to fly with the IMSAFE checklist, it's time to turn your attention to the aircraft's paperwork. The ARROW acronym is a handy way to remember the five documents that must legally be on board before you take off. Forgetting even one could result in penalties from the FAA, seizure of the aircraft, or even denial of insurance claims.
As Talbot Martin, Associate and CFI at Yodice Associates, explains:
"The operation of an unregistered aircraft is a violation of the regulations and statutes of the United States and therefore can subject the unwary pilot to an FAA enforcement action and subject the aircraft to seizure."
These documents serve as proof of the aircraft's compliance and airworthiness. Here's a breakdown of what each letter in ARROW stands for and where you should keep these essential items.
Documents You Must Carry
A – Airworthiness Certificate
This document (Form 8100-2 for Standard or 8130-7 for Special) is issued by the FAA and confirms the aircraft meets safety standards. It must be displayed at the cabin or cockpit entrance so that it's visible to passengers and crew, as required by 14 CFR § 91.203. As long as the aircraft remains registered and undergoes its annual inspections, the certificate does not expire.
R – Registration Certificate
The FAA Form 8050-3 shows the aircraft is registered with the FAA and identifies its owner. As of 2023, this certificate is valid for seven years, and re-registration costs $5. If you're flying with a temporary "pink slip" (the application copy), remember it’s valid for only 90 days and cannot be used for international flights.
R – Radio Station License
If you're flying internationally, you'll need this FCC-issued document (Form 605). It costs about $170 and is valid for 10 years. While not required for domestic flights, it’s essential for operations outside U.S. borders.
O – Operating Limitations
This includes the FAA-approved Airplane Flight Manual (AFM) or Pilot's Operating Handbook (POH), along with all cockpit placards and instrument markings. For aircraft manufactured after March 1, 1979, carrying the specific AFM for your model is mandatory. Double-check that the POH or AFM matches your aircraft's make, model, and year, and ensure all required placards - like those for fuel capacity and V-speeds - are legible.
W – Weight and Balance Data
This document must be tailored to your specific aircraft, identified by its N-number or serial number. While you don’t need to calculate weight and balance before every flight, the aircraft-specific data must be onboard. This becomes especially important if modifications, like seat layout changes, have been made.
To keep things organized, consider storing these documents in a clear pouch mounted on the cockpit wall for easy access. During pre-flight checks, verify that the N-number on all documents matches the one painted on the aircraft exterior. Talbot Martin also suggests posting a "dispatch sheet" in the cockpit to track expiration dates for registrations, inspections, and other time-sensitive requirements.
Here’s a quick reference guide:
| Document | Form | Required For | Expiration |
|---|---|---|---|
| Airworthiness Certificate | FAA 8100-2 or 8130-7 | All flights; must be visible | None (if maintained) |
| Registration Certificate | FAA 8050-3 | All flights | 7 years |
| Radio Station License | FCC 605 | International flights only | 10 years |
| Operating Limitations | AFM/POH + placards | All flights | N/A |
| Weight and Balance | Aircraft-specific data | All flights | N/A |
Some flight schools expand the acronym to ARROWE, adding an "E" for Equipment List. This helps determine if the aircraft can legally fly with inoperative equipment under 14 CFR § 91.9. Whether you stick with ARROW or use ARROWE, the message is clear: these documents are non-negotiable. They confirm your aircraft is legal, safe, and ready to fly.
Once you've verified these documents, you can move on to setting up your cockpit and ensuring your navigation and communication tools are in order.
Navigation Tools and Kneeboards
Once your documents are verified, it's time to prepare your navigation tools for the flight. Having a well-organized navigation setup ensures you’re ready for any situation in the air.
Selecting Navigation Tools
Your navigation toolkit should include both electronic tools and reliable backups. Electronic Flight Bag (EFB) apps on your tablet or smartphone provide real-time weather updates, sectional charts, airport diagrams, and approach plates. Be sure to sync these apps via Wi-Fi before your flight to access the most current data.
However, electronic devices can fail, and that’s where paper charts come in. Always carry updated VFR sectional charts, a navigation plotter, and an E6B flight computer as part of your backup plan.
How Dream Pilot Kneeboards Help

Along with charts and EFBs, a good kneeboard can significantly improve your in-flight navigation. Aviation expert Neil Glazer emphasizes its importance:
"A pilot kneeboard is one of the cockpit essentials that every pilot from a first-time student to a seasoned ATP needs for each flight".
Dream Pilot Kneeboards are designed to simplify cockpit organization using high-strength N52 magnets to secure your device. This magnetic mounting system ensures full-screen access without blocking touch controls or your view of instruments. With the ability to rotate your device between portrait and landscape modes instantly, you can seamlessly switch from navigation maps to checklists.
These kneeboards are compatible with a range of devices, from MagSafe iPhones to larger iPad Pros and Android tablets. For devices without MagSafe, included metal plates can be placed between your device and its case. A soft elastic Velcro strap provides added security during turbulence or critical flight phases. Before takeoff, give your device a gentle tug to ensure it’s securely attached.
Magic Kneeboard vs. Adjustable Kneeboard
Dream Pilot offers two kneeboard models, each catering to different pilot needs:
| Feature | Magic Kneeboard | Adjustable Kneeboard |
|---|---|---|
| Mounting Method | N52 magnetic surface | Plastic clips and elastic straps |
| Device Compatibility | Universal (all phones/tablets) | Adjustable (smartphones and mini tablets) |
| Unobstructed Screen Access | Full, unobstructed access | Clips may block screen edges |
| Orientation Switching | Instant rotation | Requires re-mounting device |
| Stability | High; low-profile design | Moderate; may shift in turbulence |
| Durability | 5-year warranty | Elastic may wear over time |
The Magic Kneeboard stands out with its slim, 3D-printed design and magnetic system, eliminating the need to fumble with clips during busy moments in the cockpit. On the other hand, the Adjustable Kneeboard offers a mechanical "lock" feel, which some pilots find reassuring - especially those looking for a more budget-friendly option. Both models are crafted in the Czech Republic and built to handle the daily challenges of flight operations.
When deciding between the two, think about your primary device and how often you switch between portrait and landscape orientations. Pilots who frequently toggle between navigation apps and checklists often favor the quick, magnetic rotation offered by the Magic Kneeboard.
Communication Headsets
Once your navigation setup is dialed in, it’s time to focus on your communication gear. Reliable communication with air traffic control (ATC) isn’t just a convenience - it’s essential for safe flight operations. With cockpit engine noise often exceeding 100 decibels, a dependable headset becomes more than just a comfort item - it’s a critical safety tool.
When selecting a headset, consider options with Passive Noise Reduction (PNR) or Active Noise Reduction (ANR) technology to combat cockpit noise. PNR headsets, which cost between $150 and $375, rely on physical insulation to block sound. ANR headsets, priced higher at $950 to $1,300, use electronic technology to cancel out low-frequency noise (typically in the 125 Hz to 500 Hz range). This electronic noise cancellation also reduces clamping force, making them more comfortable for extended use. For example, the Bose A30 headset has reduced clamping force by 20% compared to older models, minimizing discomfort during long flights.
Speaking of comfort, it’s crucial to choose a headset that won’t distract you from critical tasks. Before committing to a new model, test it on the ground for 15 to 30 minutes to identify any pressure points. Features like adjustable headbands, lightweight materials, and high-quality ear seals can make a big difference. If you wear sunglasses, ensure the ear seals maintain a proper acoustic seal around your frames to avoid compromising noise isolation.
A noise-canceling microphone positioned close to your mouth ensures your transmissions cut through cockpit noise and reach ATC clearly. Modern ANR headsets typically offer 25–50 hours of battery life using two AA batteries. Always carry spare batteries, as a power loss will revert the headset to a louder passive mode.
For added flexibility, some ANR headsets allow you to adjust noise cancellation levels to match different cockpit environments. Advanced models even include features like built-in carbon monoxide detectors with audible alerts, offering added safety beyond what passive headsets can provide.
Aircraft Inspection and Emergency Equipment
This step-by-step inspection process builds on your earlier readiness and documentation checks, ensuring a thorough pre-flight review.
External Aircraft Walk-Around
Begin your inspection with a quick scan from a safe distance. Look for obvious issues like flat tires, leaning struts, or visible structural damage. Spotting these early can save you time by avoiding a detailed check on an aircraft that isn’t airworthy.
Once closer, follow a systematic path around the aircraft. A circular approach - starting at the cabin, moving to the empennage, then the right wing, nose, and left wing - helps ensure nothing gets missed. Test all control surfaces for smooth movement and secure hinges. Run your fingernail along propeller edges to feel for nicks or cracks. Check the tires for inflation, tread condition, and flat spots, and inspect the brakes for wear or hydraulic leaks.
Fuel quality matters as much as fuel quantity. Use a clear container to drain fuel sump samples, checking for water, sediment, or unusual colors (e.g., 100LL is blue; Jet A is straw-colored). For a Cessna 172 Skyhawk, this involves sampling from 13 separate fuel sumps to rule out contamination. Don’t rely solely on fuel gauges - use a calibrated dipstick or visually inspect the filler neck to confirm fuel levels.
Use a flashlight to examine dark areas like the engine cowling and tail cone. Check oil levels and look for leaks, loose connections, or smudges that might indicate damage. Ensure that the pitot tube, static ports, and fuel vents are free from blockages such as ice or insect nests. As flight instructor Ray Heyde wisely notes:
"The key to a good preflight is understanding what you are checking and why you are checking it".
Once the external inspection confirms the aircraft is ready, shift your focus to emergency equipment.
Checking Emergency Equipment
Emergency equipment isn’t just a formality - it’s what you’ll rely on in a crisis. Start by confirming the fire extinguisher is accessible and fully charged by checking its pressure gauge. Give seatbelts and harnesses a firm pull to ensure they’re secure and free of wear or fraying.
Next, inspect the Emergency Locator Transmitter (ELT). Verify that its inspection is up to date (typically required every 12 months) and check the battery’s expiration date. Functional testing should follow the guidelines in the Pilot Operating Handbook (POH), usually restricted to the first five minutes of any hour. If your aircraft uses fuses, make sure you have spares with the correct amp ratings.
For flights over water, mountains, or remote areas, adjust your survival gear to the environment. A basic kit should include essentials like a signal mirror, whistle, fire starter, thermal blanket, water packets, and a multi-tool. For high-altitude operations, inspect oxygen masks and confirm the system is ready. A well-stocked first aid kit is also a must.
| Emergency Item | Verification Method | Frequency |
|---|---|---|
| Fire Extinguisher | Check pressure gauge and mounting security | Every pre-flight |
| ELT | Check logbook for inspection/battery; test signal | Logs: Every pre-flight; Test: Per POH |
| Seatbelts | Physical pull-test and visual inspection | Every pre-flight |
| Spare Fuses | Count spares and verify ampere ratings | Every pre-flight |
| Oxygen System | Inspect masks, tubing, and pressure levels | Before high-altitude flight |
| Survival Kit | Verify contents are suited for the terrain | Before cross-country flight |
Cockpit Organization and Before-Takeoff Checks
Once you've completed your external inspection and verified emergency equipment, it's time to focus on cockpit organization and pre-takeoff checks. Organizing your cockpit properly reduces stress during critical flight phases and ensures you don’t miss any important tasks.
Using Dream Pilot Kneeboards for Cockpit Organization
A kneeboard can transform your lap into a fully functional workstation, keeping all your essentials within easy reach. The Dream Pilot Magic Kneeboard is a standout tool for this purpose. It features a magnetic attachment system that securely holds devices like iPads, iPad Minis, iPhones, and Android devices - even in turbulence. Its adjustable design allows you to switch between portrait and landscape modes for better visibility. Plus, its elastic strap ensures stability, preventing your devices from sliding around during taxi or takeoff.
As Tom from PilotWorkshop wisely notes:
"If you can't reach it from the pilot's seat, it might as well not be on board the airplane at all".
Beyond holding devices, a kneeboard offers a convenient surface for jotting down ATC clearances or frequency changes. Avoid cramming multiple items into small pockets, as trying to retrieve one can cause others to fall under seats, making them difficult to access. Similarly, keep your instrument panel clear - placing items on it can obstruct your view or interfere with controls, especially in turbulence.
Final Checks Before Takeoff
Before you roll onto the runway, go through your pre-takeoff checklist step by step. Reading the checklist out loud - even if you're flying solo - helps maintain focus and ensures nothing gets missed.
Start by confirming that your flight controls are free and responsive. This step is crucial, as past incidents have shown the risks of skipping this check. Make sure your seat is locked, harnesses are secure, and all doors and windows are properly latched.
Set the fuel selector to the correct tank, adjust the mixture to full rich (unless you're at high-density altitude), and configure the trim and flaps for takeoff. Double-check that your altimeter is set to the field elevation and align your heading indicator. To reduce workload during taxi, program your radios, transponder codes, and GPS waypoints before starting the engine.
When you're cleared onto the runway, use the "Lights, Camera, Action" mnemonic: turn on your landing, taxi, and strobe lights; activate the transponder; and verify that all engine instruments are in the green. These final steps ensure you're fully prepared for a smooth and safe departure.
Conclusion
A solid pre-flight routine is more than just a habit - it's a cornerstone of safe and professional aviation. By following a detailed checklist, covering everything from IMSAFE and ARROW to navigation, communication, and cockpit organization, you're ensuring your safety, compliance, and readiness for every flight. As flight instructor Ray Heyde wisely states:
"The key to a good preflight is understanding what you are checking and why you are checking it. You must know what is normal and abnormal, what is airworthy and what is not."
Diligent pre-flight checks lay the foundation for smooth navigation, clear communication, and effective emergency preparedness. Whether it’s setting up avionics, organizing your cockpit with tools like Dream Pilot Kneeboards, or conducting a meticulous walk-around, these steps reduce your workload during critical moments in the air. History has shown that discipline and the use of written checklists are essential for avoiding preventable incidents.
Take the time to verify every step. Inspect fuel quality visually, clean your windows for better visibility, and read your checklist aloud to stay focused. No matter your experience level - whether you're just starting out or have thousands of hours in the logbook - a thorough pre-flight check prepares you to handle whatever surprises the skies may bring.
FAQs
What should I do if I fail one part of IMSAFE?
If you fail any part of the IMSAFE self-assessment, it’s a clear signal to postpone the flight. This checklist is designed to assess your physical and mental condition by focusing on six key areas: illness, medication, stress, alcohol, fatigue, and emotion. Any concerns in these areas could compromise your ability to operate the aircraft safely. The best course of action is to wait until you are in optimal condition to ensure the safety of the flight.
Where should I keep ARROW documents so they’re easy to find?
ARROW documents should be kept in a specific, easy-to-reach spot on the aircraft, like a cockpit compartment or a document holder. Keeping these papers well-organized not only makes them quick to access during a flight but also helps with FAA compliance and streamlines pre-flight inspections.
What’s the minimum emergency gear I should carry for a cross-country flight?
When preparing for a cross-country flight, it's crucial to pack emergency gear for unexpected situations. At the very least, make sure you have:
- First aid kit: Essential for handling minor injuries or medical needs.
- Flashlight: Useful for visibility in low-light conditions or at night.
- Emergency signaling devices: Tools like whistles or signal mirrors to attract attention if needed.
- Basic survival items: Include water, non-perishable food, and a thermal blanket to stay hydrated, nourished, and warm.
- Communication tools: A handheld radio, an extra headset, or a fully charged cell phone can be lifesavers for staying in touch or calling for help.
These essentials help you stay prepared for medical issues, harsh conditions, or equipment malfunctions during your journey.